Description
Plug and Play video conferencing is when you connect your computer to an external camera, mic, and speaker to turn any space into a video conference room. This is different from the dedicated Distance Learning classrooms that are equipped with state of the art teleconferencing technology.
This Guide Will Help You to:
Identify different plug and play conferencing technology
You may find the following technology at Idaho State University.
Set up Video conferencing
Know that this process is the same for most plug & play video conferencing technology.
-
Create your Zoom Meeting, for more information see Web Conferencing Using Zoom.
-
Connect the device's USB cable to the computer.
-
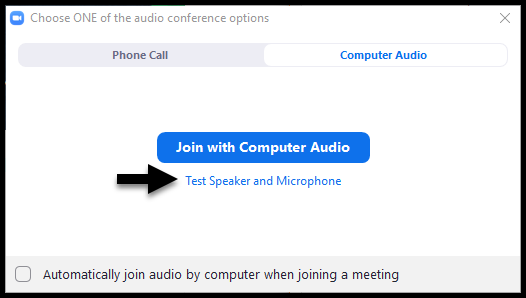
As the Meeting Host, start your meeting.
-
Click the “Test Speaker and Microphone”.
-
In the Speaker dropdown menu, select the specific device. (look for Meeting Owl or Jabra Speak).

-
You should hear a test sound play from the speaker. If yes click yes.
-
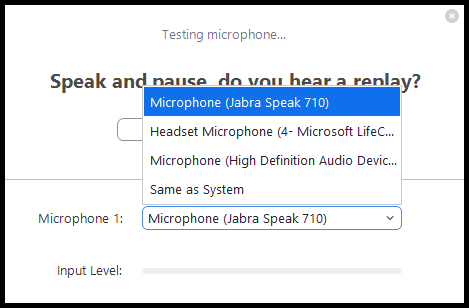
In the Microphone dropdown menu, select the specific device. (look for Meeting owl or Jabra Speak.
-
Speak into the mic and pause. You should hear your voice; if yes, click yes.
-
Click the white Join with computer Audio button.
-
Click the blue Join with computer audio button.
-
You can mute or turn on the audio in the room by clicking on the Mic icon.

-
To select the correct camera, select the up arrow next to the Video icon.
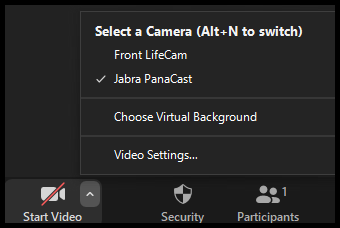
-
Select the specific device. (look for Meeting Owl or Jabra PanaCast).
Zoom Cloud Recording
The Zoom Cloud Recording feature has been made available to all ISU Zoom Licesend accounts. Any host can easily start a cloud recording from their Zoom Meeting. Cloud Recordings are stored on Zoom.us on the Recordings page. If the host uses the Zoom Activity in Moodle and schedules their meetings there. Recordings will automatically populate the "Cloud Recordings" tab in the activity. Because of limited storage, recordings are kept for 365 days and then are automatically deleted. There is the capability to download videos from the Zoom Cloud and store them on another storage platform.
Start Cloud Recording Automatically (Before Meeting)
Watch Start Automatically on YouTube
Sign in to Zoom.us with your ISU Gmail credentials. Go to My Meetings. Click on Schedule a meeting or Select a desired meeting from the Upcoming meetings list. Click Edit this meeting. Under Meeting options, enable Record the meeting automatically. Select Record in the cloud. Save your Changes.
During the meeting, you, as the host, will see the recording indicator in the top-left corner while the recording is active.
After the meeting has ended, you can locate your recording on Zoom.us on the Recording tab or in the Zoom activity under the Cloud Recording Tab.
Start Cloud Recording Manually (During Meeting)
Watch Start Manually on YouTube
Start a Zoom meeting as the host. Click the option to Record. Select Record to Cloud, You will see the recording indicator in the top-left corner while the recording is active.
During a Zoom recording, you, as the host, can Stop or Pause the recording. If you stop the recording and start it again, a new video file will be created for the next recording segment. If you pause the recording and start it again, Zoom will record to the same video file for the recording segment.
After the meeting has ended, you can locate your recording on Zoom.us on the Recording tab or in the Zoom activity under the Cloud Recording Tab.
Access Video Classroom Recordings
When utilizing the Zoom activity, cloud recordings will be accessible to you and your students in the course. Recordings created in the cloud give you the ability to change playback speed, trim video, turn on closed captions, and search transcript.
-
Sign in to Moodle ISU, locate desired course.
-
Click on the Zoom activity.
-
Click Cloud Recordings.
-
Click on the desired topic.
Note: You can filter between recordings by Date.
-
Click on the specific video.
-
After viewing, close the recording window.
Rename Cloud Recordings
Recording Names by default will use the topic of the Meeting. To rename recordings you need to go to your account on Zoom.us. Click the “Recordings” page. Once the page has loaded, make sure you are in the “Cloud Recordings” tab. Under the meeting topic click your desired meeting. Next to the topic name, click the pencil icon. Type your desired name, click save. The name will also update automatically in the Zoom Activity on Moodle.
Store Cloud Recording
Users can keep their videos on Zoom Cloud Storage for the duration of the semester. Recordings are set to auto-delete after 250 days when initially recorded. For example, a cloud recording created on Aug 23, 2021 would be deleted on January 20, 2022 . If a user has made a recording that they want to keep indefinitely, It is recommended to move a copy of desired recordings and related files to Google drive. For more information see Zoom Cloud Storage Archive Policy.
Seek Further Assistance
For information regarding the classroom, contact the related academic department
For technology assistance please contact the IT Service Desk at (208) 282-HELP (4357) or help@isu.edu
For strategies in teaching with Zoom please contact the ITRC at (208) 282 5880 or itrc@isu.edu