Description
Zoom has two types of recordings, local recording, and cloud recording. Local recordings are saved to your computer. Cloud recordings are saved to the Zoom Cloud where they can be viewed, shared, and downloaded. Both options provide standard MP4 video, M4A audio, and chat text files.
This Guide Will Help You to:
-
Start Recording
-
Record Locally
-
Record using the Cloud
-
Record automatically
Start Recording
-
After starting your meeting, you start recording by pressing Record on the bottom of your Zoom meeting window.

-
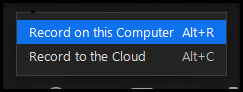
A pop-up will appear asking where you want to record: Record on this Computer or Record to the Cloud.
-
You’ll know recording has begun because a red light will appear in the upper left corner of your Zoom window with the words “Recording.”

-
Click on the pause icon if you want to pause the recording.

-
Click on the start icon when you are ready to resume recording.

-
Click on the stop icon when you’re ready to stop the recording.

Record Locally
Your local recordings are stored on your computer hard disk. By default, they’re in your Documents folder in a file named zoom. Here are more details on finding your local recordings. You can also enable automatic recording, a setting that is off by default.
-
Open the File Explorer.

-
Open the Documents folder.

-
Open the Zoom folder and your zoom recordings should be in this folder.
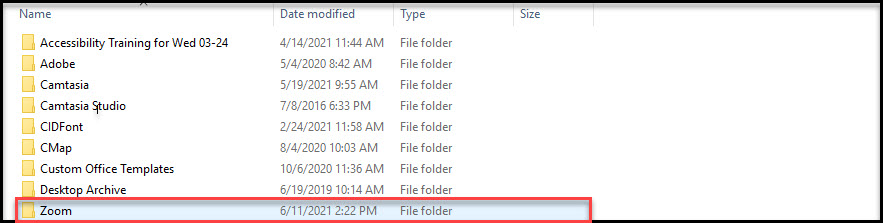
Note: Your Zoom recording is organized by date, time, course name and meeting ID.
Record using the Cloud
Your cloud recordings are stored on isu.zoom.us on your Recordings page and can also automatically populate the Zoom activity in your Moodle course to easily distribute the recordings to your students. This is done by either scheduling a new meeting or Importing an existing meeting into the Zoom activity. The following steps will show you how to find your recordings in the Zoom activity in Moodle.
-
From your course page, select the Zoom activity.
-
Click on the “Cloud Recordings” tab and you should see the zoom recordings.

Note: Your Zoom recording is organized by chronological order from most recent to earliest.
Record automatically
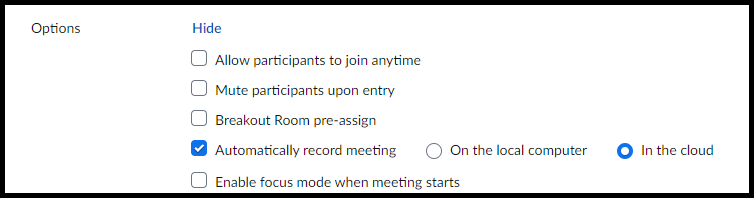
You can schedule or edit your meetings to record automatically. This will allow the meeting to start recording as soon as a user joins the Zoom meeting.
-
Go to the desired meeting's Edit page.
-
Find Options and select Show.
-
Enable Automatically record meeting, Select either On the local computer or In the cloud
Seek Further Assistance
For additional assistance please contact, ITRC at (208) 282 5880 or itrc@isu.edu
For more information please visit, Zoom Help Center:

This work was created by the Idaho State University Instructional Technology Resource Center and is licensed under a Creative Commons Attribution-NonCommercial 4.0 International License.