Description
The TinyMCE editor in Moodle ISU appears on any page where text can be entered. You can use the editor to manipulate text, insert images, create links, etc.
This Guide Will Help You to:
Identify Icons in the Moodle ISU TinyMCE Editor
Icons on the toolbar may be used to assist you with formatting, inserting, linking, and other functions in Moodle ISU.

The First Row of the TinyMCE Editor
[Note: You may need to highlight the desired word or words before selecting the button in the HTML editor in order for those words to be impacted, such as adding Bold, Italics, or other options.]
|

Undo - Select this button to undo the previous action.
|
|

Redo - Select this button to redo an action.
|
|

Bold - Select this button to bold any sentence or word.
|
|

Italic - Select this button to italicize any sentence or word.
|
|

Text Foreground Color - Highlight text and select this button to determine the text color.
|
|

Sketch - Select this button to open the Sketch tool. Use a stylus, finger, or mouse to create / edit images and then select “Insert Sketch” to add the image to the editor.
|
|

Image - Select this button to add an image.
|
|

Multimedia - Select this button to insert multimedia, including links to media, videos, or audio files..
|
|

Record Audio - Select this button to record audio files and embed them directly into the editor.
|
|

Record Video -Select this button to record video from your webcam and embed it directly into the editor. This has a 2-minute maximum recording time.
|
|

Components for Learning (C4L) - Select this button to open C4L, which provides a set of visual components designed explicitly for Learning.
|
|

H5P - Select this button to create and embed H5P content.
|
|

Link - Select this button to create a link.
|
|

Unlink - Select this button to remove a link.
|
|

Record Screen and Camera - Select this button to record your screen (with the option to also record you in a small bubble) for up to 5 minutes and embed it in the editor.
|
|

Preview -Select this button to open a preview of the text screen to show what the page will look like when it is published.
|
|

Panopto Recorder - Select this button to open the Panopto recorder and select either the Panopto Browser Tool or Panopto App for recording.
|
|

More - Select this button to open the second row of the TinyMCE editor.
|
The Second Row of the HTML Editor
Note: You may need to select the show more button to see this additional row of buttons.
|

Align Left - Select this button to align the text or image with the left-hand margin.
|
|

Align Center - Select this button to center the text or image on the page.
|
|

Align Right - Select this button to align the text or image with the right-hand margin
|
|

Left to Right Directionality - Select this button to type left to right, such as for English.
|
|

Right to Left Directionality - Select this button to type right to left, such as for Arabic.
|
|

Decrease Indent - Select this button to decrease the indent of a paragraph.
|
|

Increase Indent - Select this button to increase the indent of a paragraph.
|
|

Bullet List - Select this button to create a bullet list.
|
|

Numbered List - Select this button to create a numbered list.
|
|

Equation Editor - Select this button to create and edit equations.
|
View Menu
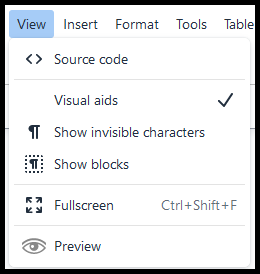
-
Source code - Select this to open the source code pop-up window, where you can view and edit the code for the page (HTML or JS.)
-
Visual aids - Select this to toggle on / off borders around table cells.
-
Show invisible characters - Select this to show invisible characters, such as paragraph breaks.
-
Show blocks - Select this to highlight HTML tags such as Divs, Spans, Paragraphs, and lists.
-
Fullscreen - Select this to view the TinyMCE editor in fullscreen mode.
-
Preview - Select this button to open a preview of the text screen to show what the page will look like when it is published.
Insert Menu
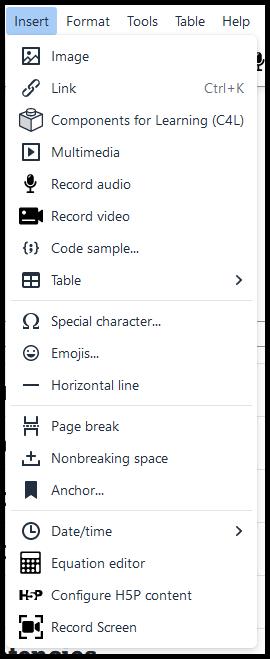
-
Image - Select this to insert an image into the page.
-
Link - Select this to create a link on the page.
-
Components for Learning (C4L) - Select this button to open C4L, which provides a set of visual components designed explicitly for Learning.
-
Multimedia - Select this to insert existing audio or video clips.
-
Record audio - Select this to record audio, and embed it into the page.
-
Record Video - Select this to record video from your webcam (2 minutes maximum.)
-
Code sample - Select this to insert and embed syntax color highlighted code snippets into the editable area.
-
Table - Select this to insert a table into the page.
-
Special Character - Select this to insert special characters into the page.
-
Emojis - Select this to insert emojis into the page.
-
Horizontal Line - Select this to add an HTML line to your text.
-
Page break - Select this to add a page break (<p>) to your text.
-
Nonbreaking space - Select this to add a nonbreaking space at the current cursor location.
-
Insert Anchor - Select this to add anchors to your text.
-
Date / Time - Select this to insert the current date and / or time at the cursor point.
-
Equation Editor - Select this to launch the equation editor for creating and inserting equations.
-
Configure H5P content - Select this to open the H5P editor and insert H5P content into the page.
-
Record Screen - Select this to record your screen (with the option to also record you in a small bubble) for up to 5 minutes and embed it in the editor.
Format Menu
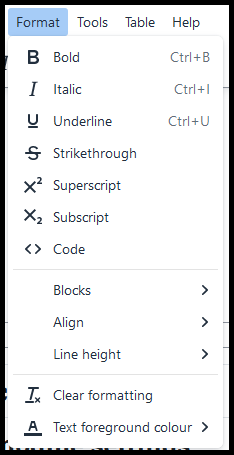
-
Bold - Select this to bold text on the page.
-
Italic - Select this to italicize text on the page.
-
Underline - Select this to underline text on the page.
-
Strikethrough - Select this to strikethrough text on the page.
-
Superscript - Select this to create superscript text on the page.
-
Subscript - Select this to create subscript text on the page.
-
Code - Select this to type code into the editor.
-
Blocks - Select this to select the heading structure of text.
-
Align - Select this to select the alignment of text on the page.
-
Line height - Select this to determine the line height of text spacing (this defaults to 1.5 spacing.)
-
Clear formatting - Select this to clear the formatting of text on the page.
-
Text foreground color - Select this to determine the color of text on the page.
Tools Menu

-
Source code - Select this to open the source code pop-up window, where you can view and edit the code for the page (HTML or JS.)
-
Word count - Select this to see the word count of the text in the page.
-
Accessibility checker - Select this to open the accessibility checker and determine if there are any accessibility errors that need to be corrected.
-
Media Manager - Select this to open the Media manager, where you can add media files.
-
Sketch - Select this to open the Sketch tool. Use a stylus, finger, or mouse to create / edit images and then select “Insert Sketch” to add the image to the editor.
Table Menu
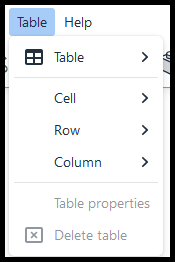
-
Table - Select this to create and insert a table in the page.
-
Cell - Select this to edit a cell in the table.
-
Cell properties - Select to edit the cell’s properties.(border, color, size, alignment)
-
Merge cells - Select to merge two cells together.
-
Split cell - Select this to split a cell into two cells.
-
Row - Select this to edit a row in the table.
-
Insert row before - Select to insert a row before the selected row.
-
Insert row after - Select to insert a row after the selected row.
-
Delete row - Select to delete the row from the table.
-
Row properties - Select to edit the row’s properties. (border, color, size)
-
Cut row - Select to cut a row from the table.
-
Copy row - Select to copy a row in the table.
-
Paste row before - Select to paste a row before the selected row.
-
Paste row after - Select to paste a row after the selected row.
Editing in Source Code (HTML or JS)
-
Select Source code from the View menu to access the source code editor.
-
You will see the code that comprises the webpage.
-
Edit or Add HTML code to the page.
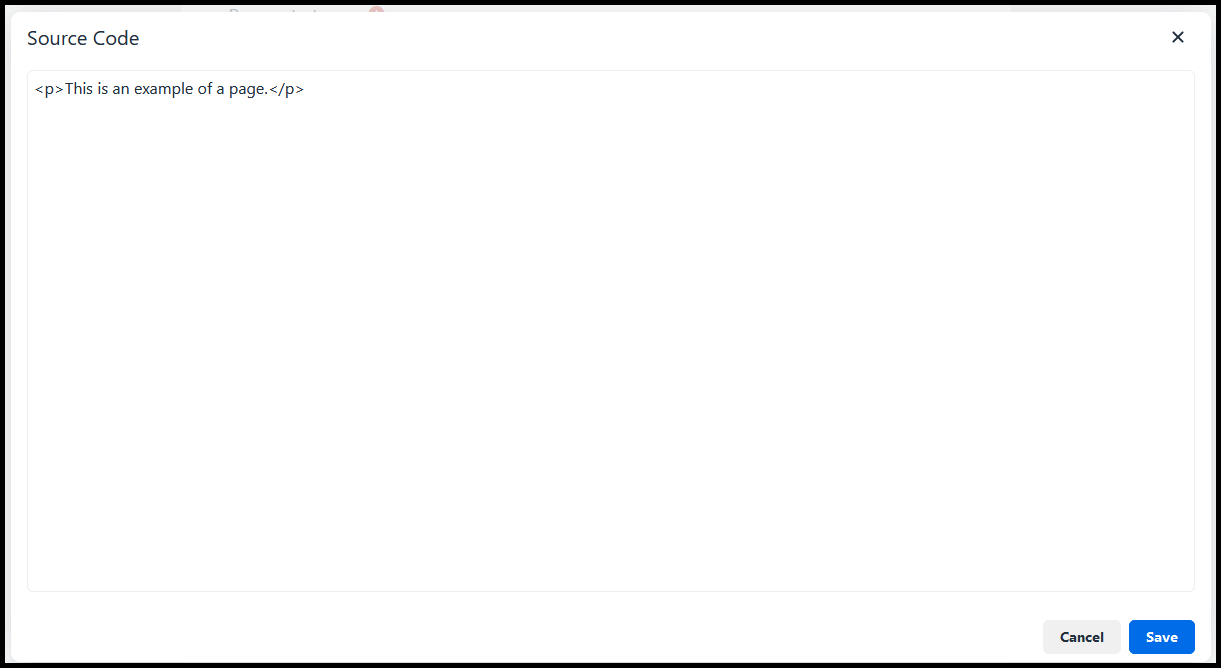
To save:
-
Select Save and display to save the page.
-
Select Cancel to delete the changes made to the page.
Seek Further Assistance
For additional assistance, please contact the ITRC at (208) 282 5880 or itrc@isu.edu
For more information, please visit Moodle.org: TinyMCE editor

This work was created by the Idaho State University Instructional Technology Resource Center and is licensed under a Creative Commons Attribution-NonCommercial 4.0 International License