Description
The Wiki activity allows students to create a collaborative document by building pages together, similar to Wikipedia. Unlike other collaborative editing programs (such as Google doc) the Wiki is a standard Moodle activity, so no extra permissions, sharing or logins are needed. Although Wikis are usually collaborative, it is possible to allow each student to create their own Wiki for individual use.
Note: While the Wiki activity in Moodle ISU is not difficult to master for new users, it is recommended to work with the ITRC for an initial walkthrough of the tool to capture it’s nuances.
This Guide Will Help You to:
Adding the Wiki Activity to a Course
-
At the top of the course page, toggle editing on

-
Locate the week or section in which you wish to add the Wiki
-
Select Add an activity or resource
-
Select Wiki

For more information see, Adding an Activity in Moodle ISU [Faculty]
General
-
In the Wiki name text box, type a name to represent your Wiki (this step is required)
-
In the Wiki description text box, type a description of and/or instructions for your Wiki

-
If you would like this description displayed on the course page, check the Display description on course page check box
-
From the Wiki mode drop-down menu, select:
-
Collaborative Wiki - sets the Wiki to allow all students access to the same Wiki
-
Individual Wiki - each student has their own Wiki that only they can edit
-
In the First page name, type a name for the first page (this step is required)

Warning: Once created, the name of the first page of the Wiki cannot be changed. However, it is useful to use that front page as a “Table of Contents” to keep the organization and allow for easy navigation.
Format
-
From the Default format drop-down menu, select an option:
-
HTML - a wiki page with the standard atto editor
-
Creole - common wiki markup language for which a small edit toolbar is available in Moodle
-
Nwiki - a wiki page with limited text editor
-
Check the Force format chec kbox to prevent students from choosing a different format other than the default format selected

Note: These options only set a default mode, students are able to choose a different format other than the one selected.
Common module settings
-
This section allows you to set the Availability for students
-
Show on course page (visible to students)
-
Hide from students (students cannot see or access)
-
Make available but not shown on course page (this allows a link to the Wiki to be placed somewhere else in the course for students to access)
-
ID number - leave as blank
-
Group mode - for more information, see Groups and Groupings
Restrict access
For more information on restricting access, see Restrict Access
Activity completion
For more information on activity completion, see Activity Completion
Tags
For more information see, Using tags
Competencies
For more information see, Competencies
Send content change notification
Tick the box to notify course participants that changes have been made to this activity. Only users who can access the activity will receive the notification.

Save
-
Select Save and return to course to be taken back to the course homepage
-
Select Save and display to be taken to the Wiki activity
-
Select Cancel to delete the activity and return to the homepage of the course
Managing a Wiki
-
Once the wiki is set up, select the link to open the wiki
-
Use the tabs across the top of the page to manage the wiki

Settings
Opens the general settings for the Wiki.
More
Select More to open the options for Filters, Permissions, Backup and Restore.
-
Filters - For more information see Filters
-
Permissions - Moodle allows changes to specific role capabilities based on the context. For example, an instructor may want all students (users with a student role) to be able to view comments but not post them. For more information see Permissions.
-
Backup and Restore - allows the instructor to save selected activities such as a Wiki and upload it into a different course or restore selected activities into a different course. See Backing Up and Restoring a Moodle ISU Course for more information.
Note: We recommend that you contact the ITRC for assistance with this ta
Adding a New Page
-
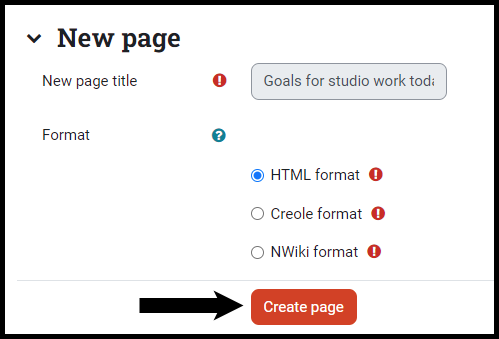
Once the wiki has been added to a course, select the link to reach the Create page screen
-
Select Create page

-
In the HTML format box, type the name of the next page with double brackets on each side.
Note: You can also add instructions either above or below the page name.
-
Below the box, select Preview to see what the new page will look like
-
To create the new page, select Save

-
A selectable link with the name you entered in double brackets will be added

Adding More Pages
To add addition pages to the wiki:
-
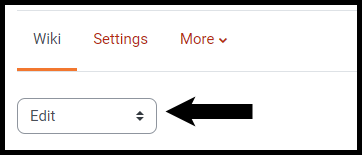
From the drop down menu, select Edit

-
In the HTML format box, type the names of each new page with double brackets on each side
-
Select Save to save the changes
Comments tab
The Comments tab displays comments that have been made concerning the current Wiki page. You can edit or delete your own comments.
-
To add comments, select Add comment under the title of the page
-
To delete your comment(s), select the trash icon underneath your comment box and follow the prompts
-
To edit your comment(s):
-
Select the gear icon underneath your comment box
-
In the comment text box, change or add text or images
-
Select Save changes when you are satisfied
History tab
The History tab displays the date, and time of changes made, as well as the editor. It also contains links to the previous version of the page. To compare previous versions:
-
Select the History tab
-
Under the Diff column, select the two versions you want to compare. (Selecting the left or right side will display the page on that half of the screen)
-
Select Compare selected
To restore a previous version:
-
Next to title of version you wish to restore, select Restore
-
Select Yes to continue, or No to return to viewing previous version
Note: Restoring an older version of the page creates a new version with the old version settings in the page history. For example, restoring version 5(old) over version 6(current) will create version 7, which is actually a copy of version 5. This ensures that student work is not lost, and that the restoration can be undone.
Map tab
The Map tab allows you to see a map of the Wiki pages, and their relation to one another. Select an option from the Map menu to change the configuration. The list of options is as follows:
-
Contributions: All pages you have edited
-
Links: All pages linked to this page
-
Orphaned Pages: Any pages that have no links to or from them
-
Page Index: Displays pages in a “tree” like format
-
Page List: Displays pages in alphabetical order
-
Updated Pages: Displays a list of which pages were edited and when
Files tab
The Files tab displays any and all files that have been uploaded to the current Wiki page, and allows you to download, upload, or remove uploaded files from the current page. To Edit wiki files:
-
Select the Files tab
-
Select Edit wiki files
-
Select on the file in the Files box
-
A pop-up will appear with the options to Download or Delete the file if you wish
-
Select Update to save changes
To delete the file:
-
In the Edit file pop-up window, select Delete
-
Select Ok if you are sure you want to delete the file
Administration tab
The Administration tab allows you to remove pages or delete versions of pages. To do this:
-
From the Admin menu drop-down menu, select Remove pages (you may have to Select List all at the bottom before seeing every page)
-
To the left of the page, select the Trash icon
-
The page will automatically be removed (Moodle will not double check this decision)
Add a New Wiki Page
To add a new page to the Wiki, you will create a link to it from a current page.
-
Select the Edit tab
-
In the Editing this page section, type the name of the new page you want to create and surround it on both sides with two square brackets
-
At the bottom of the page, you have three options:
-
Select Save to save the new page titles
-
Select Preview to see what the new page will look like
-
Select Cancel to delete any changes
Seek Further Assistance
For additional assistance, please contact the ITRC at (208) 282-5880 or itrc@isu.edu
For more information, please visit Moodle.org: Wiki activity.

This work was created by the Idaho State University Instructional Technology Resource Center and is licensed under a Creative Commons Attribution-NonCommercial 4.0 International License