Description
Once you have created a workshop, you will need to edit the Assessment Form. There are four different assessment forms that can be used within the workshop. Once you have selected a specific assessment type, you will be taken to this form to edit the specific grading criteria.
For more information, see Moodle.org: Workshop grading strategies
This Guide Will Help You to:
Understand the Assessment Form Options
During the Setup Phase, you selected one of the following Grading strategy options:
-
Accumulative grading - Grades are averaged together and comments for various submission/assessments are lumped together.
-
Comments - Only comments are given during the assessment phase. No grade is given.
-
Number of errors - Comments can be given and a checklist of yes/no is given as a grade regarding specific assertions to be considered during the assignment.
-
Rubric - You can set specific grading requirements that students must meet and select the grade based on those requirements.
Based on your selection during the Setup Phase, you will be presented with the corresponding Assessment Form to set the grade and criteria to be used during the Assessment Phase.
Warning: Grading strategies cannot be changed once the workshop has moved to the Submission Phase.
-
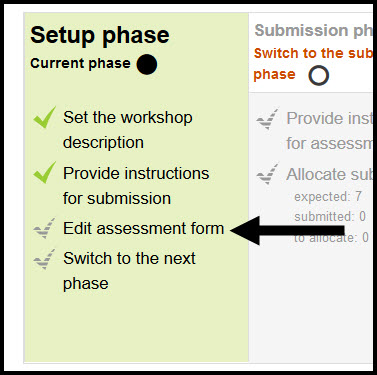
Select the name of the workshop.
-
In the Workshop Planner, you will see a list of tasks to complete in the Setup Phase
-
Click Edit assessment form
Edit the Accumulative Assessment Form
Each assessment criterion has its own numeric grade along with optional weighting and optional comments; a final grade is calculated on the basis of the separate grades and their respective weightings.
For more information, see Moodle.org: Accumulative grading strategy
For each specific aspect you will do the following:
-
Description - Type the description of the aspect for which the student is to assess submissions.
-
Best possible grade/Scale to use drop-down - Select one of the following type:
-
None - no points awarded.
-
Scale - if selected, choose one of the following from the Scale dropdown menu:
Note: You can also create your own custom scale.
-
Point - if selected, enter the number of points possible in the Maximum points box.
-
Weight - Select the weight you would like to apply to this particular aspect.
Note: Aspects can be worth differing amounts, i.e., Assertion 1 will be worth twice as much as Assertion 3 because you selected 2 in the Weight category.
-
If you need more aspects, select Blanks for 2 more aspects button.
Note: If you leave an Aspect description blank, it will not be included in the form.
Select one of the following to save settings:
-
Save and continue editing - saves your current work and remains on the current page.
-
Save and preview - allows you to save your current work and preview the form as the students would see it.
-
Save and close - saves your work and takes you back to the Workshop Planner.
-
Cancel - does not save your work and takes you back to the Workshop Planner.
Edit the Comments Assessment Form
Participants will provide feedback only, as comments either in a single field or as responses to a series of guiding questions.
For more information see, Moodle.org: Comments
For each specific aspect you will do the following:
-
Description - Type the description of the aspect for which the student is to assess submissions.
-
If needed, select the Blanks for 2 more aspects button to add more Aspect boxes
Select one of the following to save:
-
Save and continue editing - saves your current work and remains on the current page.
-
Save and preview - allows you to save your current work and preview the form as the students would see it.
-
Save and close - saves your work and takes you back to the Workshop Planner.
-
Cancel - does not save your work and takes you back to the Workshop Planner.
Edit the Number of Errors Assessment Form
The assessment form consists of several assertions, each of them can be marked as passed or failed by the reviewer. Various words can be set to express the pass or failure state - eg Yes/No, Present/Missing, Good/Poor, etc.
For more information see, Moodle.org: Number of errors
For each specific assertion you will do the following:
-
Description - Type the corresponding description for each assertion
-
Word for the error - Insert a word that will be used to indicate that the assertion was not met. Examples include: No, Zero, Missing, and Poor.
-
Word for the success - Insert a word that will be used to indicate that the assertion was met. Examples include: Yes, 100, Present, and Good.
-
Weight - Set which Assertions are worth more than others by selecting a number higher than one. For example: Assertion 1 will be worth twice as much as Assertion 3 because you selected 2 in the Weight category.
Edit the Rubric Assessment Form
The rubric assessment form consists of a set of criteria. For each criterion, several ordered descriptive levels are provided. A number grade is assigned to each of these levels. The reviewer chooses which level answers/describes the given criterion best.
For more information, see Moodle.org: Rubric
For each specific criterion you will do the following:
-
Description - Type a Criterion with which the students will use to assess their peers’ submissions. Example of a Criterion: Overall quality of the paper with levels 1-5 (1 being a Weak paper and 5 being an Excellent paper).
-
Level Grade and Definition - Select the level your Criterion will have from the dropdown menu. In the text box, lay out the items that define that level. In the first Level Grade and Definition text field, Type the description of how the criterion would look in order to receive the selected number of points.

-
In Rubric configurations section, Select List or Grid to determine the rubric layout.
Select one of the following to Save:
-
Save and continue editing - saves your current work and remains on the current page.
-
Save and preview - allows you to save your current work and preview the form as the students would see it.
-
Save and close - saves your work and takes you back to the Workshop Planner.
-
Cancel - does not save your work and takes you back to the Workshop Planner.
Seek Further Assistance
The following are additional workshop guides, for more information about each phase, see:
For additional assistance please contact, ITRC at (208) 282 5880 or itrc@isu.edu
For more information please visit, Moodle.org:

This work was created by the Idaho State University Instructional Technology Resource Center and is licensed under a Creative Commons Attribution-NonCommercial 4.0 International License